Wednesday, August 16, 2023

Deep Dish Lard Day 2: Tentative Schedule


Tentative schedule for next month's Deep Dish Lard Day, email me at wharding91@gmail.com if you are interested in running another game, as we may have space for one or two more tables. Or if you would be interested in helping out GM the What A Cowboy demos!


Morning games (10 AM):
  • What a Cowboy demo games!

  • Midgard: 100 Years War, Your chance to try out the soon to be released Midgard rules by James Morris. Can the English Longbow prevail against the French nobility? GM: Paul Scrivens-Smith

  • Sharp Practice: The Battle of Culloden, command Jacobite or Government forces to skirmish on Drummossie Moor, can the Highland forces win the day or will Government volleys end the hopes of the Young Pretender. GM: Ed Harding

  • Chain of Command: DMZ Attack on Firebase Airborne, early morning of May 13th, 1969. The 6th NVA Regiment supported by units of the K-12 Sapper Battalion launched one of the Vietnam war's bloodiest assaults on an American firebase. Paratroopers of Alpha Co, 2/501st alongside the gunners of Battery C, 2/319th Artillery must fight tooth and nail to prevent their positions from being overrun and destroyed. GM: Liam Harding

Afternoon games (2 PM):

  • What a Cowboy demo games continue!

  • Chain of Command: Espana, Last stand at Palacio De Ibarra March 18th, 1937 elements of 1st Dio Lo Voule lead by Commander Alberto Montanari are holed up inside a hunting lodge known as the Palacio de Ibarra. Republican counter attacking forces including the Garibaldi Battalion supported by Paulov's Tank Company need to clear them out to get into position to retake Brihuega. GM: Liam Harding

  • Chain of Command: Aubigny France, May 24 1940:  As the Dunkirk evacuation began to unfold in May 1940, the German 2. Inanterie-Div (mot) seized bridges on the Somme River with  lightly armed recon units  At Aubigny  the 4e DIC (Colonial Infantry Division) immediately launched an attack with the 24e RTS (Senegalese Tirailleur Regiment) to retake the bridge.  Can the Germans hold the  bridge until reinforcements arrive or will the ‘Senegalese’ secure the bridge to defend against the inevitable German Offensive? GM: Jim Heniff

  • O Group: Attack on Saint Manveiu, June 26 1944 The opening attack put in by the 6th Royal Scottish Fusiliers and the 9th Royal Tank Regiment against the village of Saint Manveiu, and its environs, which were held by a thin line of the 21st SS Panzer Grenadier regiment. GM: Ed Harding

Monday, March 27, 2023

Rorke's Drift SP2 Changes


A lot of people have asked for Ed's changes made to Sharp Practice 2 for his Rorke's Drift game. Figured we could upload them here on the blog, feel free to use them for your own Zulu War games!

Rules Changes

Firing and Movement Random event tables


Monday, December 26, 2022

2023 Adepticon Art de la Guerre Ancients-Medieval Tournament 3-24-23

Chitown Wargamers will hosting a 28mm open ADLG Tournament at Adepticon '23. The convention is being held at the Renaissance Schaumburg Convention Center, Schaumburg, Illinois. 

The event will be located at the nearby Hyatt Regency (where the historical events are generally held). We have space reserved for 12 players max. You need to register online thru the convention organizers starting January 8. 

Any 200-point list from 4th edition of the rules are fine. 2 versions of each list allowed. BYO mat and terrain. Tournament will run from 9AM-7PM is three 2.5-hour rounds.

If there is enough interest, we hope to grow this event in future years and perhaps include a 15mm tournament as well.

If you have any questions, contact me at a_gonatas@ameritech.net.

Mark


Monday, November 7, 2022

Bolt Action AAR from Four Star Tournament

For something a little different, we have a Bolt Action tournament AAR.  This was held on Saturday November 5th.  The venue is a game store in Chicago called Dice Dojo located on north Broadway in the Edgewater neighborhood.  The main floor is composed of open gaming tables on one side and retail space on the other mostly featuring board games and collectible card games.  The tournament itself was held in the basement.  They have around a dozen 4 x 6 tables and an absolutely staggering amount of community terrain and miniatures along the walls.

The tournament itself was an escalation format.  That means each round was more points than the previous round.  It was 3 rounds at 450, 750 and 1000 points.  This format has a few advantages.  The first is an overall shorter tournament.  First game was at 10am and we were done by 6pm.  The "standard" sized game is typically between 1,000 and 1,250.

It also means you can't optimize an army for a specific points value.  Some armies are stronger when smaller,  others when larger.  This helps limit that.

And finally you get more variety because people feel a little more open to experimenting.

It was basically swiss pairings.  I was running my 92nd Buffalo Soldiers which are bog standard US riflemen.  I relied on large squads to carry my day.  My vehicles were limited to a machine gun jeep at 450, a Greyhound at 750 and both a  Greyhound and 75mm M4 at 1,000.  

My first game was against Al running some sort of mounted French cavalry at 450 points.  He had a couple decent sized cavalry units, a small engineer squad with flamethrower, a motorcycle / sidecar with an ATG and finally an FT17 with a machine gun.  The scenario featured a paradrop squad for each of us on turn one.  He flame throwered one of my squads out of existence with it. I then landed next to him and shot him out of existence with my dropped squad!  Lots of maneuver and fire the rest of the game with a couple of desperate close combats.  Veteran cavalry in close combat is brutally tough.  It was back and forth but he pulled away at the end, partially because I screwed up the mission requirements.  Doh!  Fun game nonetheless and he came in second place. Not a great picture, but you can see a couple of my lonely units after the game after they realized they moved onto the wrong portion of the board to score maximum points.  Oh well :)


The second game was against Jim at 750.  He was using a British platoon fully mounted in 3 Bren carriers, and also included a Sherman.  Eeek.  It was an open board so I was very nervous.  Remember I mentioned people like to experiment?  He tried Regular troops instead of Veteran as 5 men squads loaded into his carriers.  He didn't realize how vulnerable his small squads were and additionally played rather  aggressively.  It didn't help that I got lucky and destroyed a Bren carrier with an 82mm mortar, forcing his troops out well within rifle range of two large squads.  Ouch.  I ended up killing something like 8 out of his 10 order dice without losing any of my own units.  These games never feel very good whether on the winning side or losing side.  Jim was really good about it though and chalked it up to learning a new way how not to run his British.


My last game was against Zack at 1k points.  He was running some sort of crazy Polish Partisan army with some crazy rules and 16 order dice to my 11.  I don't have a picture, but it was one of the more built up boards with a fairly significant town covering half the board, and fields surrounded by stone walls covering the other half.  The Mission orders were to occupy the location of a plane that would crash on turn 4 creating a 3" crater.  Honest to God, the stupid plane crashed on top of my bazooka unit destroying it. You can't make this up!  On the bright side the location was in the middle of the town and slightly better for me as I had more major units near it including 3 of my 4 infantry squads, all my minor units and my Sherman.  I had gotten lucky the second and third turns eliminating a couple of Zacks larger squads that would have been near the crash site.  The old chestnut about it being better to be lucky than good is certainly true!  In any case, I thought I had the game on turn 6 as I moved a nearly full strength squad onto the crater.  But that also moved me within 6" of one of his booby traps, which was one of his crazy army rules.  I knew it was there, but it would only activate on a 6.  No problem!  He rolled the necessary 6 and the whole freaking squad vaporized with 3D6 hits.  Not even dogs tags were left behind.  He moved a single Forward Observer onto it to end the turn.  Queue the final role of the game with a 50/50 to end the game or play a final turn 7.

Lucky me, I got one more turn and pushed another big squad onto it eliminating his poor Observer who never realized what rolled over him.  Zack made a last ditch effort by firing a rocket launcher that potentially hit every unit within 6" of the target point by targeting an adjacent building.  He had literally missed over 20 die rolls at that point to hit one of my units.  No lie, the poor guys was completely robbed by it not hitting a single time.  Until now.  We each had multiple squads at risk.  He missed 4 of my units but hit two of his own, destroying both.  It was honestly rather funny and we were both shaking our heads at the end.  We both seriously enjoyed the game as we both were in a position to win at the end.  I ended up killing something like 10 units to 3 or 4 units lost of my 11.

Two wins and the huge unit kill differentials were good enough for 4th place out of 16.  It was a very good prize selection and I grabbed an old Armored Fury box which contained 3 x M4 Shermans, 2 x Panthers, a mini Bolt Action rules and a Tank Wars rules.

The tables looked good but I thought slightly on the open side.  That apparently was by design to limit the power of close assault monster units.  The TO was Shane and he did a very good job.  The rounds moved smartly and he made some quick rulings on a couple of my games where we either weren't sure of the rule.  Overall it was a great experience.  I'm definitely going to sign up for the next local tournament, which will be at Polar Vortex next February.

Final standings are here at Best Coast Pairings

Monday, October 10, 2022

On the eve of destruction

 Take a look around you boy, it's bound to scare you, boy

Ed, Chris and I broke out my old 20mm Vietnam collection to give Chain of Command: DMZ Second Tour another go. 

We used the "Going With a Bang" scenario from the Blitzkreig: 1940 supplement by TooFatLardies - a platoon of US Marines was tasked with capturing a bridge and strong point before withdrawing PAVN forces could destroy them. 

Chris and I took command of the USMC and took two M60 teams and a M113 as support options. The rules allow for the US to embed the M60 LMGs into existing squads, so we beefed up two of our three squads with the extra firepower (bringing their collective base fire to 24 dice within 12").

Ed's PAVN forces came with a sapper team tasked with blowing the objectives, a Political Cadre senior leader, MMG team in a bunker, extra RPG team and a pre-planned ambush.

Additionally Ed picked up the "Local Knowledge" trait for the PAVN, which gives their patrol markers a 14" move distance and allows them to be 14" apart, opposed to the base 12". This made a huge difference as it allowed him to stop our jump-off points from being further up the table.
 

Marines deploy while Ed observes their advance

Quickly Chris' first squad deployed on the right, intent on pushing towards the bridge. Ed countered with a squad of PAVN regulars, descending into a jungle firefight with both sides saving well. Eventually Ed decided to fall back into the jungle as his sappers were able to blow the bridge early on.

PAVN squad deploys to slow the Marine advance

Sappers set their charges on the bridge

My Marine sections, supported by the M113 advanced slower up the left side, until we reached an open field and decided to book it across. At this moment, Ed deployed his MMG team in a bunker using his pre-planned ambush and slowed us down.

We found the MMG only having seven dice actually wasn't much of a fight for Marines who, including their own attached LMG were throwing 18 dice back at them at effective range. Something we may tweak is the points values of the HMG/MMGs for 'Nam. 

The Marines suppressed and cleared the bunker easily, but it took up time that would have been better spent rushing the objective.

With time running out and Ed's sappers making their way to the second objective, Chris and I decided to run the M113 up the road in the hopes of breaking some PAVN forces. Knowing full well that a RPG (AP of 11) would shred the M113 if hit (Armor of 2). 

The M113 exchanged fire with PAVN forces and managed to shrug two hits with RPGs off, but Ed's second squad managed to land the fatal blow with their final RPG shot...

M113 is smoked by the hero RPG gunner

As the Americans desperately pushed the riverbank to try and suppress the sappers, the Vietnamese charges went off successfully landing Ed a victory. With the PAVN forces melting away into the jungle the Marines were stuck trying to ford the river. 

Special shout out to Chris' Marine squad who took on three PAVN squads and made it through the whole scenario. Starting with 14 men, they ended the game with four.

Looking forward to continuing to use 'Nam stuff that I had painted for Arc of Fire years ago, as the CoC: DMZ works very well overall.


Final dispositions of forces


Friday, February 11, 2022

Richmond is a hard road to travel - Seven Pines

This past week, myself, Chris, Ed and Mark got together to re-fight Seven Pines/Fair Oaks from the Peninsular Campaign. We used Altar of Freedom, a brigade-level ruleset intended to be used for big battles, we've been using this recently and it is definitely rewarding to play an entire battle in a 3-4 hour span. In the case of Seven Pines we got through both days, May 31st and June 1st of fighting. 

Mark took the reins as the Union commander, Brig. Gen. Heintzelman with myself acting as Brig. Gen. Sumner, arriving to support his Corps. 

The Confederates were run by Ed as Gen. Joe Johnston and Chris handling Maj. Gen. Longstreets corps that started on table leading the attack.

Although Altar of Freedom always for ahisotrical deployments, we kept to a general historical deployment of forces to see how it would play out.

Beginning of May 31st, 1862

Heintzleman and Keyes' Corps deployed on table to begin with Casey and Couch's Division forming the front rank of defenses and Kearney's division beginning in reserve, quickly deploying to the Union left in anticipation of a Confederate attack. 

In Altar of Freedom Generals have traits tied to their historical performance, in Longstreet's case he risked not activating on any given turn with a Roll of '1', when the battle stepped off at 1 PM, Longstreet blinked and failed to advance. This allowed the Union forces to begin to dig in and adjust their line. 

Anderson's division advances on the Union right 

Throughout the first day of fighting the Confederates focused their attack on the Union left, guarded by a Couch's division of Keye's command, stationed near Fair Oaks station. Numbering three brigades and a battery of guns, the Confederate division under Anderson had six brigades and a battery operating against them.

Anderson smashes through Couch's line

While the Union left remained relatively quiet in the opening hours, Anderson decisively smashed through Couch's division, routing one brigade and throwing back two more.

Sedgwick's Division arrives

By 4 PM on the 31st, Sedgwick's divsion had arrived on the Union right and began to deploy in support, this forced the Confederates to pause their assault. Meanwhile, Johnston arrived on table alongside Gustavus Smith's Corps.

D.H. Hills' Division comes to life

Knowing their time is running out on the first day, Longstreet decides to finally send D.H. Hill's division forward against Casey's division around Seven Pines. A brutal fight for the Union breastworks follows with the Rebs being able to push the Union back before nightfall.

Evening falls on May 31st

During the night phase, the Union shore up their line, and Hooker's division arrives in support of Heintzelman while Richardson's division along with Bullhead Sumner arrive on the Union right. Confederate reinforcements during the night is Huger's division under Longstreet, who followed his historical failure to arrive on the first day. They deploy on the Union left, ready to attack at dawn.

Confederates renew the assault on June 1st
Sumner gallantly leads a charge...and is grievously wounded!


As dawn breaks on June 1st, the Confederate forces launch an all-out assault against the Union left, pushing back Heintzelman's division and almost killing Heintzleman multiple times! Mark rolls well and manages to keep his General alive in two back to back combats. 

Meanwhile, Sumner attempts to pressure the Confederate left near Fair Oak's station while they are preoccupied with Seven Pines. His progress is limited and manages to break one Confederate brigade, but a swift counterattack by Chris' forces stops the advance and wounds Sumner causing him to be removed from play.

Dispositions at the end June 1st

Into the afternoon of June 1st, both forces remain locked around Seven Pines and Fair Oaks station. The result of the battle is a Confederate tactical victory, three Union brigades and one artillery battery were broken at a loss of only one Confederate brigade from D.H. Hill's division. Johnston avoided being wounded in our refight, meaning Lee will not be taking command of the Army of Northern Virginia for the time being...

Seeing Little Wars TV tease their Peninsular Campaign series inspired me to put on Seven Pines, and I am hopeful I can get the forces together by this Summer to refight the Seven Days Battles for their 160th Anniversary as well.


Saturday, February 5, 2022

Fistful of Lead - Horse & Musket

It's been a while since we've posted something up, so time to fix that!

Mark, Dan and I got together last night to try out a new game (for us).  I've been an inveterate rules collector for ages and ages, and the advent of Wargames Vault has only made it worse.  One of the series that I've picked up along the way is Fistful of Lead (FFoL) by Jaye Wiley of Wiley Games.  It started as a wild west cowboy game, but as of recent years, he's been expanding the reach of his game system by creating what are essentially versions dedicated to specific eras.  I think his first release after the original cowboy version was Horse & Musket.  Since then, he revamped and released the core rules and has been rereleasing some of his early works so they all align with his core rules.  H&M was re-released in 2021.

At it's heart, FFoL is a skirmish game.  You create detachments of around 5 or so figures for each player.  Each figure is equipped with weapons and assigned one or more traits, which generally upgrade or enhance the figure in some manner.  There are in excess of 75 different traits, although most are very simple in application.

Gameplay is via a standard deck of 52 cards.  At the start of a turn, you give each player one card for each figure they have on the table.  Order of figure activation is determined by the cards, starting with Kings, then Queens, then Jacks and so on.  Whomever has a King puts it down, and order of figure activation is further determined by suit, starting with the Spades, Hearts, Diamonds and finally Clubs.  So if one player has the King of Hearts and another the King of Clubs, the player with the King of Hearts would pick one of his un-activated figures and perform two actions from those available.  Once that figure resolved its actions, the player with the King of Clubs would pick an un-activated figure and do the same.

There is one twist which makes the card activation more interesting.  There are some cards that give special traits or abilities on the figure played.  For example, the Queen of Hearts used to activate a figure also removes one wound for free.  Playing a 7 on a figure allows it a re-roll on a single die during its activation.  And finally, an Ace allows the player to use it as any card!  It makes you really think about what you need to accomplish!  Actions are your standard skirmish fair with Moving, Shooting, Aiming, Reloading, Switching Weapons, etc. So much for the background, onto the game.

Retrieve the Letter!

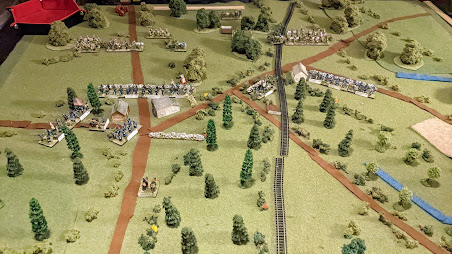
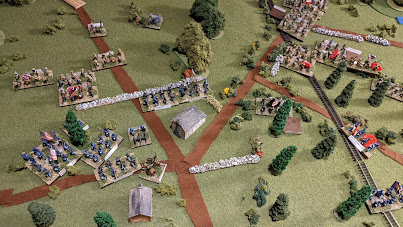
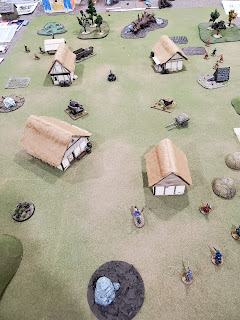
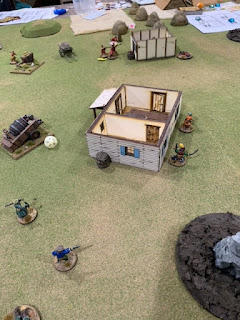
There would be three detachments, each playing for themselves.  There were two Cossack, and one Polish Haiduk detachments.  Each detachment had a leader, a second and three regulars.  There were a variety of weapons, mostly swords, pistols and muskets based on what the figures were actually equipped with.  The picture below was the starting positions.  This is facing North (for future reference).  My Cossack detachment started in the South, and included the only mounted figure.  Dan and the Haiduks were in the East, and Mark and his Cossacks were in the North West.


Each building (including the shed at the top left, and the chicken coop at the top right) had something to be found.  In order to find whatever was in the building, you had to perform a "hard task".  Which meant spend one of your actions in the building and roll an 8+.  There were 6 different things that could be found based on drawing from a set of 6 cards that were faced down:
ace - Peasant treasure worth 1 point
2 - Peasant treasure worth 1 point
3 - Peasant treasure worth 1 point
4 - Village treasure worth 3 points
5 - Church silver worth 4 points
6 - Letter!!!!  worth 6 points

If you drew an ace through 5, you called for a treasure chest.  To claim your loot, you had to carry it off the board in the chest.  If you drew the 6, no chest. So everyone knew when the Letter was found.

If you rolled a "1" while searching, some bad happened and you would be immediately attacked!  Roll a D6 and refer to the chart:
1 - Dog attack.  1 wound, D8 attack.
2 - Angry villager w/Rock. 1 wound, D8 attack.
3 - Angry drunk revelers. 1 wound each, D8 attack armed with beer steins (as Club)
4 - 2 Dogs attack.  1 wound each.  D8 attack.
5 - Angry villager w/Rock. 1 wound. D10 attack.
6 - Angry Cossack w/Sword. 1 wound.   D10 attack.

Sadly, we never rolled a 1 during searching (or at least didn't notice while playing).

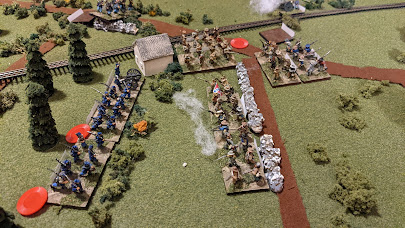
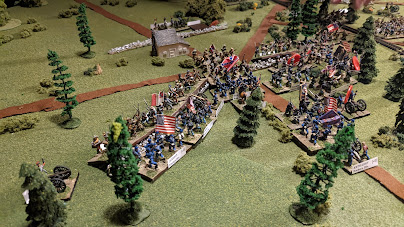
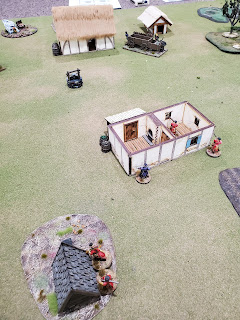
Each detachment pushed up towards its nearest buildings, taking an occasional pot-shot at each other but doing no damage.  Early on you can see the Haiduks facing down Mark's Cossacks and plinking back and forth between the buildings and cart.  Chests were found rather quickly in this area, but no Letter.


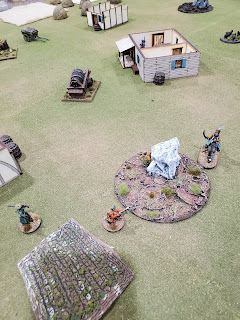
While that was going on, I pushed my leader up towards Mark and his Cossacks.  That ultimately ended rather poorly for me as my leader got knocked off his horse, and finally cut down as he got mobbed.  Luckily all was not lost as my Second found the Letter!  I like to think that my Leader was buying time for him to run with the letter!!!


Maybe a coward, but I took the letter and ran for the safety of the board edge.  Mark chased, but the Bluderbuss (Orange guy) didn't have the range to reach, and his other figure wasn't loaded.  Score 6 points for the good guys!!!


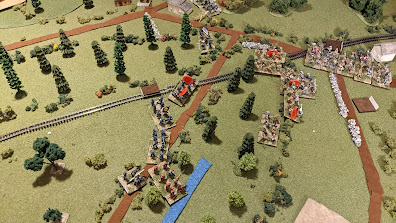
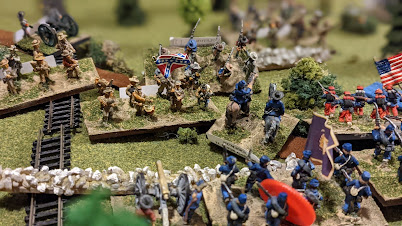
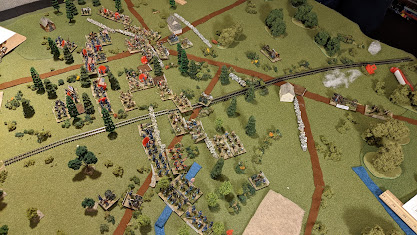
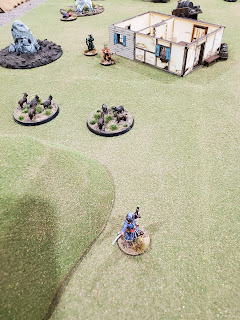
Unfortunately things were starting to look grim for me.  Mark and Dan were both flooding south.  You can see Mark's Cossacks in the foreground and Dan in the background.  I already had 2 figures taken out (you can see one next to the building) and another off-board.  The Blunderbuss of doom had taken out the guy behind the building, as well as wounding Dan's leader.  By this time he had already crawled around the other side of the building.  Mark had 2 chests, and had already killed 3 or 4 figures so my 6 points from the Letter weren't looking quite so good anymore.


The last few turns ended up in an orgy of destruction with three more of Dan's detachment and two more of Mark's biting the dust in a swirling melee of death.  At that point we called the game.  It was going to be a near run result between Mark and I, but we didn't bother tallying things up.  

We agreed the game was a complete success.  FFoL H&M gave a very fun and engaging game.  It gave a really nice feel for the period, with having to consider what to fire, when to swap between loaded weapons and when to swap to sword and charge with a weapon advantage.  We did all this in just over 2 hours without having previously played the game.  This is definitely a keeper and I'll be bringing it out again, and possibly running something at a convention.